Skip to content
All articles
8 min read

How Much Does a Web App MVP Cost in 2026?

MD Rakibul Islam RakibMD Rakibul Islam RakibFull-stack developer, DevOps & Linux engineer
How Much Does a Web App MVP Cost in 2026?

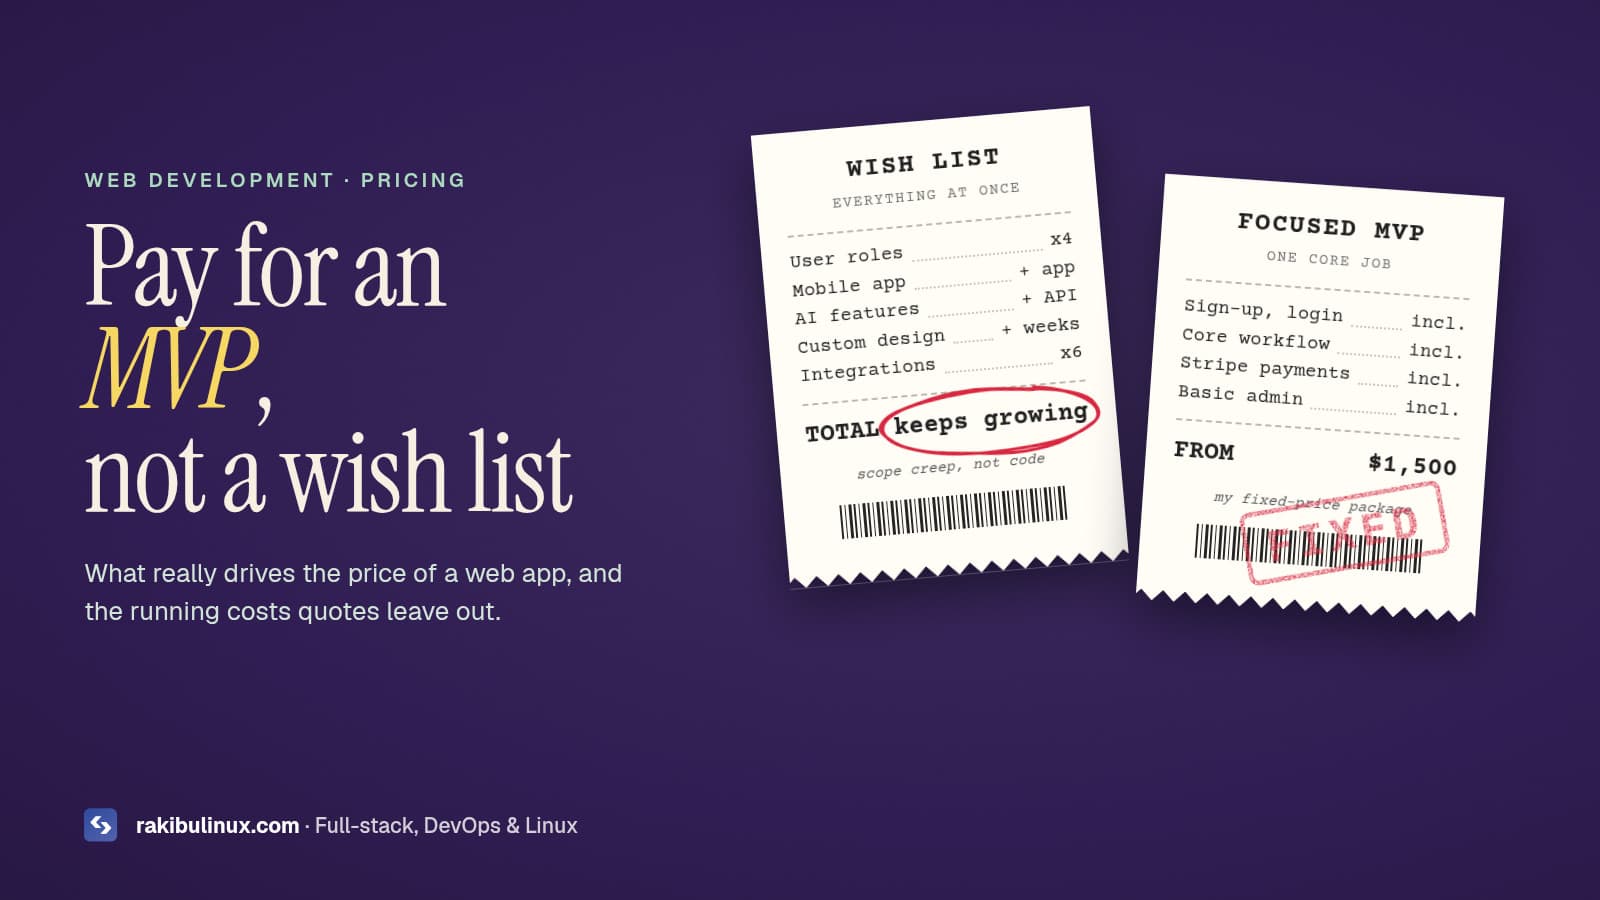
A web app MVP costs what its scope costs: login, one core workflow, payments and a basic admin. A focused MVP like that starts at $1,500 with me.

"How much will my app cost?" is the first question almost every founder asks me, and the honest answer is "it depends on what you put in it." That isn't a dodge. Code is cheap to write and expensive to write twice, so the price is driven by how many features, user roles and integrations you insist on before launch. This guide shows you how I scope and price an MVP, what actually moves the number, and the running costs most quotes leave out, so you can compare offers and cut your budget without cutting the product.

Key takeaways

  • Scope sets the price, not the tech stack. Every extra user role, integration or "small" feature adds design, code, tests and support.
  • A real MVP does one job well. Sign-up, the core workflow, payments if you charge, and a simple admin. Everything else waits for user feedback.
  • Fixed-price beats hourly for an MVP when the scope is written down. You know the cost before work starts.
  • Budget for running costs: hosting, email, payments (Stripe charges 2.9% + 30¢ per US card payment), backups and a few hours of upkeep a month.
  • Own everything from day one: the code repository, domain, hosting and payment accounts should be in your name.

What is an MVP, really?

A minimum viable product is the smallest version of your idea that a real user can use to get a real result, and that you can charge for or learn from. It isn't a demo and it isn't version 1.0 with fewer colours. It's the shortest path from "sign up" to "this solved my problem."

For a booking app that means: a customer signs up, picks a slot, pays, and gets a confirmation email; the owner sees bookings in an admin page. Reviews, loyalty points, a mobile app and an AI assistant are all good ideas. None of them prove that people will book and pay.

What drives the cost of a web app MVP?

When I quote a project, these are the things I count. Each one is a multiplier, not a fixed add-on, because it touches the database, the UI, the tests and the admin.

1. The number of user roles

One type of user (customers) is simple. Two roles (customers and admins) is normal. Three or more (customers, vendors, staff, admins with different permissions) means every screen needs rules about who sees what. Marketplaces cost more than shops for exactly this reason.

2. The core workflow

This is the thing your app does that nothing else does for your users: the booking flow, the quote builder, the report generator. It deserves most of the budget. Everything around it (login, settings, emails) is standard work I've built many times.

3. Payments and billing

A one-off payment with Stripe Checkout is quick. Subscriptions with trials, upgrades, proration, coupons and invoices are a project of their own. Marketplace payouts to other people (Stripe Connect) add onboarding and compliance steps.

4. Integrations

Every third-party API (a CRM, an SMS gateway, Google Calendar, an AI model, an accounting tool) brings its own auth, rate limits, errors and webhooks. Budget for each one separately.

5. Design depth

A clean UI built from a proven component library is fast. A fully custom brand design from Figma, with animations and many breakpoints, takes longer to build and to test. If you already have Figma designs, the build is faster and more predictable.

6. Data you already have

Importing customers from spreadsheets or migrating from an old system is often underestimated. Messy data has to be cleaned before it can be imported.

Your wish list Sign-up and login Core workflow Payments Basic admin Mobile app AI recommendations Team roles and permissions Analytics dashboard MVP 4 features that prove people will use and pay. The rest waits for feedback. Later: version 2 is built from what real users ask for.
Most of an MVP budget is saved by crossing features out, not by finding a cheaper developer. Keep what proves the idea, park the rest until users ask for it.

How I scope an MVP in practice

Before I give a price I write a one-page scope with the client. It has four parts:

  1. The user and the job. "A salon owner wants customers to book and pay for appointments online."
  2. The happy path, step by step. Every screen from landing page to confirmation email.
  3. The admin path. What the owner needs to see and change on day one (usually a list, a detail page and a few buttons).
  4. The "not now" list. Features we agree to leave out. Writing them down stops them from sneaking back in halfway through.

With that page agreed, the price stops being a guess. My full-stack MVP package starts at $1,500 for a scope like this, built with Next.js, NestJS and PostgreSQL, deployed to a server you own. Bigger scopes get a fixed quote after the scoping call.

Fixed price or hourly?

  • Fixed price works when the scope is written down. You know the total, and the developer carries the risk of estimating badly. Changes become small, separately priced add-ons.
  • Hourly suits open-ended work: ongoing improvements, research, or rescuing an existing codebase where nobody knows what's inside yet.
  • Milestones make either model safer. Pay per finished, visible piece (for example: login and database, core workflow, payments and launch), not a big amount up front.

If you're comparing freelancers, my checklist for hiring a freelance developer covers the questions to ask and the red flags to watch for.

The running costs most quotes leave out

Building the app is a one-time cost. Running it is monthly. Ask every developer to list these before you sign:

  • Hosting. A single VPS runs most MVPs comfortably for a few dollars to about $40 a month. Platforms like Vercel are convenient but bill by usage; I compared both in Vercel vs self-hosting costs.
  • Domain and email. A domain is a yearly fee. Transactional email (sign-up confirmations, receipts) needs a provider such as Amazon SES, Postmark or Resend; most have free or cheap starter tiers.
  • Payment fees. Stripe's standard US rate is 2.9% + 30¢ per successful card payment, with extra for international cards and currency conversion. Check the current Stripe pricing page for your country.
  • Backups and monitoring. Offsite database backups and an uptime monitor cost little and save the business when something breaks.
  • Maintenance. Security updates, dependency upgrades and small fixes. Plan a few hours a month, or a support plan.

Five ways to lower the cost without hurting the product

  1. Cut roles before features. Launch with customers and one admin. Add staff accounts when you have staff.
  2. Use hosted pages for hard parts. Stripe Checkout and the customer portal handle cards, receipts and subscription changes for you.
  3. Do manual work behind the scenes. If refunds happen twice a month, do them in the Stripe dashboard instead of building a refund flow.
  4. Start from a component library instead of a fully custom design system. Custom polish can come with version 2.
  5. Bring your own content. Final texts, logos and images ready at the start avoid rework later.

What about AI app builders?

Lovable, Bolt and similar tools are great for clickable prototypes and for testing a layout with users. Where they struggle is everything after the demo: real auth rules, payments, data migrations, security and hosting you control. Many of my projects now start from an AI-built prototype and turn it into a production app. I wrote about that path in taking a Lovable app to production and the risks in my vibe coding security checklist.

Frequently asked questions

How much does it cost to build a simple web app?

A simple web app with sign-up, one core workflow, payments and a basic admin starts at around $1,500 with my fixed-price package. More user roles, integrations or custom design raise the price, and you get a fixed quote after a scoping call.

How long does it take to build an MVP?

It depends on the scope, but a focused MVP takes weeks, not months, when the scope is written down and content is ready. The longest delays usually come from changing requirements and waiting on decisions, not from the coding itself.

Is it cheaper to use a no-code or AI builder?

It's cheaper to start, and often the right choice for a prototype. It can cost more later if you hit limits on logic, data, security or hosting and have to rebuild. Many founders prototype with AI tools and then hire a developer to make it production-ready.

What should a developer's quote include?

A written scope with the screens and features included, a "not included" list, milestones with what you get at each one, who owns the code and accounts, and the expected monthly running costs. If a quote is a single number with no scope, ask for one.

Who should own the code and hosting accounts?

You. The code repository, domain, hosting, email and payment accounts should be created in your name or your company's, with the developer added as a collaborator. That way you can switch developers at any time.

Want a fixed price for your MVP?

Send me your idea and I'll turn it into a one-page scope with a fixed price and milestones. See the MVP package, my other web development services, or contact me with a few lines about who your users are and the one job your app should do.

MD Rakibul Islam Rakib

Written by

MD Rakibul Islam Rakib

Full-stack developer, DevOps engineer and Linux system administrator with 5+ years of production experience. I deploy, harden and fix servers and web apps for clients worldwide, and everything in this article runs on real servers I manage, including this site.

  • web app MVP cost
  • MVP development cost
  • how much does an app cost
  • SaaS MVP
  • fixed price web development
  • hire full-stack developer

Keep reading

Cloudflare in Front of Your VPS: Setup Checklist
DevOpsOct 7, 2026

Cloudflare in Front of Your VPS: Setup Checklist

Cloudflare in front of a VPS: use Full (strict) SSL, restore real visitor IPs in Nginx, and firewall the origin so only Cloudflare reaches ports 80 and 443. Cloudflare's free plan gives a small business site a global CDN, DDoS protection and free HTTPS at the edge, and setup looks like "change your nameservers, done". The problems show up later: an endless redirect loop, logs and rate limits that only ever see Cloudflare's IPs, attackers going around Cloudflare straight to the server's IP, or a checkout page cached for everyone. This is the checklist I use when I put a client's VPS behind Cloudflare, with the Nginx and UFW commands for Ubuntu. Key takeaways Use Full (strict), never Flexible. Flexible sends traffic to your server unencrypted and causes redirect loops with an HTTPS redirect on the origin. Give the origin a real certificate: Let's Encrypt or a free Cloudflare Origin CA certificate. Restore the visitor's IP with Nginx's real_ip module and the CF-Connecting-IP header, or fail2ban and rate limits see only Cloudflare. Lock the origin so ports 80 and 443 only accept Cloudflare's IP ranges, and don't leak the server IP through other DNS records. Cache static assets, not personal pages. Never cache HTML for logged-in users, carts or dashboards. 1. Add the site and check every DNS record When you add a domain, Cloudflare scans your existing DNS records. The scan misses things, so compare it against an export from your current DNS provider before switching nameservers: MX, TXT (SPF, DKIM, DMARC, verification records), CNAMEs for subdomains and any CAA records. Missing an MX record breaks your email the moment the nameservers change. Then decide which records are proxied (orange cloud) and which are DNS only (grey cloud): Proxied: the website and app hostnames: example.com , www , app . DNS only: mail servers (MX targets), anything using non-web ports like SSH or a database, and services that must see the client directly. Only HTTP and HTTPS on standard ports (plus a short list of alternates) go through the proxy on the free plan, so an SSH hostname must be grey-clouded. 2. Set SSL/TLS to Full (strict) This setting controls how Cloudflare talks to your server . The visitor always sees HTTPS either way, which is why the wrong choice can go unnoticed. Flexible: Cloudflare connects to your server over plain HTTP. Traffic between Cloudflare and your server is unencrypted, and if Nginx redirects HTTP to HTTPS you get ERR_TOO_MANY_REDIRECTS , because every request arrives as HTTP and gets redirected forever. Full: HTTPS to the origin, but any certificate is accepted, even expired or self-signed ones. Full (strict): HTTPS with a valid certificate checked. This is the one you want. Newer zones may show "Automatic SSL/TLS" instead, where Cloudflare picks the most secure mode your origin supports. That's fine as long as your origin has a valid certificate so it can choose Full (strict). You can check or override it under SSL/TLS → Overview. 3. Give the origin a certificate Two good options: Let's Encrypt with Certbot. The HTTP challenge works through the proxy in most setups. The more robust option is the DNS challenge with the Cloudflare plugin and a scoped API token (Zone → DNS → Edit for this zone only), which also works before DNS points at the server. Cloudflare Origin CA. Generate it under SSL/TLS → Origin Server, with a validity of up to 15 years, and install the certificate and key in Nginx. It's trusted by Cloudflare only, not by browsers, so it breaks if you ever switch a record to DNS only or pause Cloudflare. If renewals start failing later, my Certbot renewal guide covers the Cloudflare-specific causes. 4. Restore real visitor IPs in Nginx Behind the proxy, every request comes from a Cloudflare IP. Your access logs, fail2ban, rate limiting and any "block this IP" rule become useless, or worse, ban Cloudflare. Cloudflare sends the real IP in the CF-Connecting-IP header; Nginx's real IP module can use it, but only for requests from Cloudflare's ranges. Generate the config from Cloudflare's published lists: { for ip in $(curl -s https://www.cloudflare.com/ips-v4) $(curl -s https://www.cloudflare.com/ips-v6); do echo "set_real_ip_from $ip;" done echo "real_ip_header CF-Connecting-IP;" } | sudo tee /etc/nginx/conf.d/cloudflare-realip.conf sudo nginx -t && sudo systemctl reload nginx Reload a page and check the access log shows your own IP. Cloudflare's ranges change rarely, but they do change, so re-run this every few months or from a monthly cron job. Real traffic arrives through Cloudflare with the visitor's IP in a header Nginx can trust. Requests that skip Cloudflare and hit the server's IP directly are dropped by the firewall. 5. Lock the origin to Cloudflare Cloudflare only protects traffic that goes through it. If someone finds your server's IP, they can bypass the CDN, the WAF and DDoS protection completely. Allow web traffic only from Cloudflare's ranges with UFW: for ip in $(curl -s https://www.cloudflare.com/ips-v4) $(curl -s https://www.cloudflare.com/ips-v6); do sudo ufw allow proto tcp from "$ip" to any port 80,443 comment 'cloudflare' done sudo ufw delete allow 'Nginx Full' # or: sudo ufw delete allow 80,443/tcp sudo ufw status numbered Keep your SSH rule in place before changing anything. If any app runs in Docker with published ports, UFW rules don't apply to it; see Docker bypasses UFW . For stronger protection, enable Authenticated Origin Pulls so Nginx only accepts connections that present Cloudflare's client certificate. Also stop leaking the IP: don't point grey-clouded records like mail or ftp at the same server as the website, check that emails sent from the server don't reveal its IP in headers, and remember that old DNS history sites may still show your previous IP. After a serious attack, changing the server IP is sometimes the cleanest fix, and my zero-downtime migration guide shows how. 6. Cache the right things By default Cloudflare caches static files by extension (images, CSS, JS, fonts) and not HTML. That's a safe start. Then: Send good cache headers from your app. Next.js already marks /_next/static/ files as immutable; your own uploads and images should have a long Cache-Control too. Only cache HTML on purpose, with a cache rule for public pages, and bypass it for /admin , /account , /checkout , /api and any request with a session cookie. Purge after deploys if you cache HTML, or use short edge TTLs. Caching a personalised page is the most dangerous Cloudflare mistake: one customer's account page can be served to the next visitor. 7. Know the limits Upload size: the Free and Pro plans accept request bodies up to 100 MB. Larger uploads need a DNS-only hostname, chunked uploads or direct-to-storage uploads. Timeouts: if your server takes longer than about 125 seconds to respond, visitors see error 524. Long jobs should run in the background; my 504 Gateway Timeout guide explains how. WebSockets work through the proxy on all plans, so chat and live features keep working. 8. Turn on the useful free extras Always Use HTTPS and Automatic HTTPS Rewrites (you can then drop your own HTTP→HTTPS redirect, or keep it; with Full (strict) both are fine). HSTS , once you're sure every subdomain works over HTTPS. Bot Fight Mode and a WAF rule to challenge traffic to /wp-login.php or /admin from countries you don't serve. Under Attack mode : know where the switch is before you need it. Cloudflare is one layer. The server behind it still needs the basics in my Ubuntu hardening checklist . Frequently asked questions Why do I get "too many redirects" after enabling Cloudflare? Your SSL/TLS mode is probably Flexible while your server redirects HTTP to HTTPS. Cloudflare connects over HTTP, the server redirects to HTTPS, and the loop repeats. Install a certificate on the server and switch the mode to Full (strict). Should I use Flexible or Full SSL in Cloudflare? Full (strict). Flexible leaves traffic between Cloudflare and your server unencrypted and causes redirect loops. Full without strict accepts invalid certificates, so it protects less than it seems. How do I see real visitor IPs behind Cloudflare? Configure Nginx with set_real_ip_from for each Cloudflare IP range and real_ip_header CF-Connecting-IP , then reload. Logs, fail2ban and rate limits will then see the visitor's IP instead of Cloudflare's. Does Cloudflare hide my server's IP address? Only for proxied records, and only if the IP doesn't leak elsewhere: grey-clouded records on the same server, outgoing email headers, or old DNS history. Restrict ports 80 and 443 to Cloudflare's ranges so a leaked IP is useless. Is Cloudflare's free plan enough for a business website? For most small business sites, yes: CDN, free edge certificates, DDoS protection, basic WAF rules and caching are all included. Paid plans add more WAF features, image optimisation and support. Want Cloudflare and your server set up properly? I set up VPS servers with Nginx, HTTPS, Cloudflare, real-IP logging and a locked-down firewall, and deploy your app on them. See my VPS setup service , the server hardening and security audit , all DevOps services , or contact me with your domain and hosting details.

Read article →
Landing Page That Converts: 11 Things to Get Right
Website DesignOct 7, 2026

Landing Page That Converts: 11 Things to Get Right

A landing page converts when it has one goal, a headline that names the outcome, proof near the button, answers to objections, and loads in under 2.5 seconds. Most landing pages I'm asked to fix don't have a design problem. They have a clarity problem: three different buttons, a headline about the company instead of the customer, testimonials hidden at the bottom, and a hero image so heavy the page takes five seconds to show anything on a phone. Visitors decide fast whether a page is for them. This checklist covers the 11 things I check on every landing page I build or review, in the order a visitor experiences them. Key takeaways One page, one goal, one main button. Every extra choice lowers the chance of the one you want. The headline says what the visitor gets , for whom, in plain words. Your company name can wait. Put proof next to the ask: real reviews, client names, numbers you can back up. Answer objections on the page with a short FAQ: price, time, risk, what happens next. Speed is part of conversion. Aim for a Largest Contentful Paint under 2.5 seconds on mobile, and measure conversions so you know what works. Above the fold: the first five seconds 1. Pick one goal Decide the single action the page exists for: book a call, request a quote, start a trial, buy. Remove the main menu if you can, or at least keep it minimal, and make every button on the page do that one thing. A landing page from an ad with links to your blog, careers page and social profiles is leaking visitors. 2. Write a headline about the outcome Compare "Innovative Cloud Solutions" with "Your website back online in hours, not days." The second tells the visitor what they get. A good formula is outcome + for whom + without the pain : "Bookkeeping for small cafés, done in a day a month." Under it, one sentence explains how. 3. Make the button say what happens "Submit" and "Learn more" are weak. "Get my free quote", "Book a 15-minute call" or "Start fixing my site" set expectations. Show the main button above the fold on mobile, give it the strongest colour on the page, and repeat it after each major section. 4. Show the product or the result A real screenshot, a short demo, a before-and-after or a photo of your actual work beats an abstract illustration. Visitors want to see what they're buying. Size it properly: this image is often the page's Largest Contentful Paint, so it must be compressed and loaded first. Each section answers the next question in a visitor's head, in order. The same single button appears at the top and again at the end, after the objections are answered. Below the fold: earning the click 5. Proof, right where the decision happens Put your strongest proof immediately under the hero and again near the final button: short reviews with real names, client logos (with permission), a project count or rating you can back up, and case results. Specific beats glowing: "Fixed our checkout in a day, sales came back the same evening" persuades more than "Amazing service!". Never invent testimonials or numbers. Besides being dishonest, fake reviews break consumer protection rules in many countries, and visitors can usually tell. 6. Benefits first, features second Three short blocks, each a benefit in the customer's words with the feature that makes it true underneath. "Never lose a booking" (benefit) → "automatic SMS reminders 24 hours before" (feature). 7. Show how it works in three steps People hesitate when the next step is unclear. "1. Tell us about your project. 2. Get a fixed quote within a day. 3. We build it, you approve each milestone." Three steps make the decision feel small. 8. Answer objections with a short FAQ List the questions you hear on sales calls: How much does it cost? How long does it take? What if I'm not happy? Do I need to prepare anything? Answer each in two or three sentences. A FAQ also gives Google and AI answer engines clear question-and-answer text to show, which brings more qualified visitors. 9. Keep the form short Every field you add is a reason to leave. For a first contact, name, email and one open question ("What do you need help with?") is usually enough. Ask for budget, phone and company size later, or make them optional. Show what happens after submitting: "I reply within one working day." Under the hood: speed, mobile and measurement 10. Make it fast on a phone Google treats a Largest Contentful Paint under 2.5 seconds as good, and slow pages lose visitors before they've read the headline. Compress the hero image and load it with high priority, use at most two font families, and drop heavy sliders, chat widgets and tracking scripts you don't use. My guide to fixing a slow LCP walks through each step. Then test on a real phone: tap targets big enough, no text too small, no sideways scrolling, the form easy to fill with a thumb. 11. Measure conversions, then change one thing at a time Track the button clicks and form submissions as conversions (key events in Google Analytics 4, or your ad platform's conversion tracking). Without that, you're redesigning on opinions. Once you have a baseline, test one change at a time, headline first, because it has the biggest effect. Small sites rarely have the traffic for formal A/B tests; changing the headline for two weeks and comparing the conversion rate is still far better than guessing. Website builders or a custom page? Builders like Webflow, Framer and Wix can produce a good landing page if you follow the checklist above, and they're quick to edit. A custom page built in Next.js gives you full control over speed, tracking and integration with your app or CRM. I compared both in AI website builders vs a custom website . If you're replacing an existing site, read how to redesign without losing SEO first. Frequently asked questions What makes a landing page convert? A clear single goal, a headline that states the outcome for a specific visitor, one obvious button, proof near that button, answers to common objections, a short form, and a page that loads quickly on mobile. How long should a landing page be? As long as it takes to answer the visitor's questions. A free download can be short. An expensive service needs more proof and more answers. Keep the main button visible at the top and repeat it after each major section so long pages don't hide it. Should a landing page have a navigation menu? For ad and campaign pages, usually not, or only a minimal one, because every link away from the page is a lost conversion. A service page on your main website can keep the normal menu. How many form fields should a landing page form have? As few as you need to start the conversation, often three: name, email and a short message. Extra qualifying questions can be optional or asked in the follow-up. How do I know if my landing page is working? Track conversions as events in your analytics and divide them by the number of visitors to get a conversion rate. Compare it over time and after each change, rather than judging by how the page looks. Want a landing page built to convert? I design and build fast landing pages with clear copy structure, real proof, conversion tracking and a sub-2.5-second load on mobile. See my landing page design and build service , all website design services , or contact me with your current page and the one action you want visitors to take.

Read article →
Migrate a Website to a New Server With Zero Downtime
DevOpsOct 7, 2026

Migrate a Website to a New Server With Zero Downtime

Move a site to a new server with zero downtime: lower the DNS TTL early, copy and test, do a final data sync, switch DNS and keep the old server running. Server migrations have a bad reputation because the usual approach is "copy everything, change DNS, hope". Then emails stop arriving, uploads from the last hour are missing, the SSL certificate isn't there yet and half the visitors still land on the old server. I move client sites between providers regularly, often to cut hosting costs or get off an old, unpatched machine, and the plan below is how I do it without customers noticing. It works for Node.js, PHP and WordPress sites alike. Key takeaways Lower the DNS TTL to 300 seconds at least a day before the move, so the switch spreads in minutes instead of hours. Inventory everything first: sites, databases, uploads, cron jobs, environment files, email and every DNS record. Test the new server before switching DNS with curl --resolve or your hosts file. Sync data twice: a full copy while the old server is live, then a short final sync during a brief write freeze. Keep the old server running for a week as your rollback plan, and only then cancel it. Step 1: Inventory the old server Most migration problems are things nobody remembered existed. Before touching anything, write down: Sites and apps: ls /etc/nginx/sites-enabled/ (or Apache's), pm2 list , docker ps , systemctl list-units --type=service --state=running . Databases: names, sizes, users and versions. Moving PostgreSQL 14 to 17 or MySQL 5.7 to 8 is an upgrade too; test it. Files: app code, user uploads, generated files, and the .env or config files with secrets. Scheduled jobs: crontab -l for every user, sudo crontab -l , /etc/cron.d/ and systemd timers. DNS: export every record from your DNS provider. Note MX, SPF, DKIM and DMARC records, and any subdomains pointing at the old IP. Email: does the server send mail (contact forms, receipts) directly or through a provider? Does it receive mail? Things that trust the old IP: payment provider webhooks, API allowlists, a database firewall, an SMS gateway, a partner's IP whitelist. Step 2: Lower the DNS TTL The TTL tells resolvers how long to cache your DNS record. If it's 86400 (a day), some visitors keep going to the old server for up to a day after you switch. Change the TTL of the A/AAAA records you'll move to 300 seconds, then wait at least as long as the old TTL before migrating so every cache has picked up the short value. Check what the world sees with: dig +noall +answer www.example.com The number before IN A is the remaining TTL. If you use Cloudflare's proxy (orange cloud), the switch is near-instant anyway, because visitors only ever see Cloudflare's IPs. I cover that setup in the Cloudflare VPS checklist . Step 3: Build and secure the new server Set up the new server properly from the start rather than copying the old one's mistakes: a non-root sudo user, SSH keys only, a firewall, automatic security updates. My Ubuntu 24.04 hardening checklist is the list I follow. Install the same major versions of your runtime (Node, PHP, Python) and database, or plan and test the upgrade. Then set up Nginx and the app the way I describe in deploying Next.js on a VPS with PM2 and Nginx . Step 4: First full copy of files and databases Copy files with rsync over SSH. It preserves permissions and can be re-run later to copy only what changed: rsync -aHAX --info=progress2 \ old-server:/srv/app/shared/uploads/ /srv/app/shared/uploads/ For databases, take a logical dump and restore it on the new server: # PostgreSQL ssh old-server "pg_dump -U app -Fc appdb" > appdb.dump pg_restore -U app -d appdb --no-owner appdb.dump # MySQL / MariaDB ssh old-server "mysqldump --single-transaction appdb" | mysql appdb Copy the .env files and cron jobs, and point the app's config at the new database. Don't enable cron jobs that send emails or charge cards yet, or customers get everything twice. Step 5: Test the new server before anyone sees it You need HTTPS working before the DNS switch, but Let's Encrypt's normal HTTP check needs DNS to already point at the new server. Three ways around it: copy /etc/letsencrypt from the old server, use a DNS-01 challenge with your DNS provider's plugin, or use a Cloudflare Origin CA certificate if you're behind Cloudflare. Then test the real domain against the new IP without changing DNS: curl -sI --resolve www.example.com:443:203.0.113.20 https://www.example.com/ For clicking around in a browser, add 203.0.113.20 www.example.com to your computer's hosts file temporarily. Log in, submit forms, upload a file, run a test payment, check the logs for errors. Remove the hosts entry when you're done. With a short TTL set in advance, changing the A record moves visitors to the new server within minutes. The old server stays up, so anyone still on a cached record is served normally. Step 6: Final sync and the switch The only moment data can be lost is between the last copy and the DNS switch. Keep it short: Pick a quiet time and tell the client or team. Freeze writes on the old server: a maintenance page for logged-in actions, or stop the app's workers, so no new orders or uploads land there. Final sync: re-run the same rsync (fast, only changes) and take a fresh database dump and restore. Switch DNS to the new IP. Enable cron jobs and workers on the new server, and disable them on the old one. Watch both servers' access logs. Traffic on the old one should drop to almost nothing within minutes. For a site where even a few minutes of frozen writes is too much, you can set up database replication from old to new and promote the new one at switch time. It's more work and only worth it for busy stores and apps. Step 7: After the switch Update everything that trusted the old IP: webhooks, allowlists, SPF records if the server sends mail directly. Check email both ways. Send a contact-form test and a real email to the domain. Check renewals: run sudo certbot renew --dry-run on the new server. Set up backups and monitoring on the new server on day one, not "later". Keep the old server for about a week, powered on, as a rollback. Take a final snapshot before cancelling it. Raise the TTL back to an hour or more once everything is stable. Frequently asked questions How long does it take to migrate a website to a new server? Preparing, copying and testing usually takes a few hours to a couple of days, depending on the size of the data and the number of services. The actual switch, with a short TTL and a final sync, takes minutes. Will my website go down during migration? Not if you test the new server first, lower the TTL in advance and keep the old server running. Visitors with cached DNS still reach the old server, which keeps working until their cache expires. How do I get an SSL certificate before changing DNS? Copy the existing Let's Encrypt files from the old server, use a DNS-01 challenge through your DNS provider, or use a Cloudflare Origin CA certificate if your site is behind Cloudflare. The normal HTTP challenge only works after DNS points at the new server. How long does DNS propagation take? As long as the record's TTL. With a TTL of 300 seconds set a day ahead, most visitors move within five to ten minutes. A few badly behaved resolvers cache longer, which is why the old server should stay up for a while. Can I move from shared hosting to a VPS this way? Yes. Download files over SFTP or the host's backup tool, export the database from phpMyAdmin or the control panel, and follow the same test-then-switch steps. Pay special attention to email, which shared hosting often provides and a plain VPS doesn't. Want your site moved for you? I migrate websites and apps between servers and providers, including off Vercel, Heroku and shared hosting, with testing before the switch and the old server kept as a fallback. See my hosting migration service , the VPS setup service , all DevOps services , or contact me with what you're running now and where you want it.

Read article →