Skip to content
All articles
7 min read

Git Push Rejected (Non-Fast-Forward): Safe Fix

MD Rakibul Islam RakibMD Rakibul Islam RakibFull-stack developer, DevOps & Linux engineer
Git Push Rejected (Non-Fast-Forward): Safe Fix

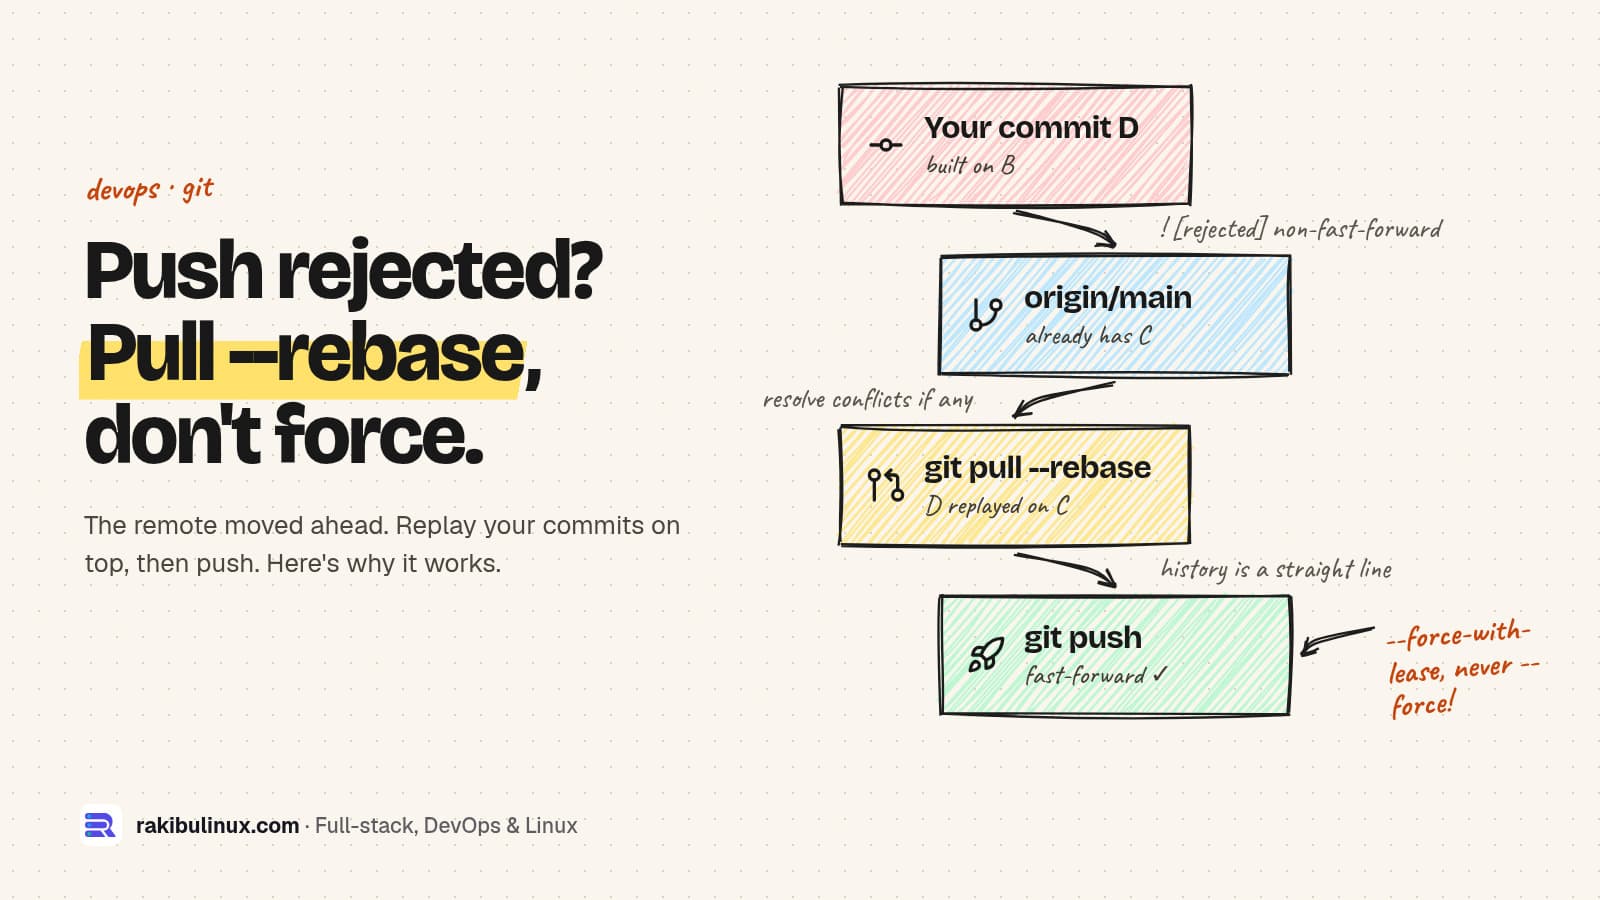
"Git push rejected (non-fast-forward)" means the remote has commits you don't. Run git pull --rebase, fix conflicts, then push. Never force shared branches.

Every developer hits this one, usually at the end of a long day when all you want is to push and go home. Git isn't broken and your work isn't lost. Git is refusing to overwrite commits that someone else (or you, from another machine, or a bot) already pushed. On my own projects, pushing to main triggers a production deploy through GitHub Actions, so I care a lot about pushing the right history. This guide covers the safe fix, when force-pushing is acceptable, and the other "rejected" messages that look similar but mean something else.

Key takeaways

  • The fix: git pull --rebase origin main, resolve conflicts if any, then git push.
  • "fetch first" and "non-fast-forward" are the same problem: the remote branch moved ahead of yours.
  • Never use plain --force on a shared branch. If you must force, use --force-with-lease, which refuses if someone pushed in the meantime.
  • "protected branch" or "pre-receive hook declined" is a permissions rule on the server, not a history problem. Open a pull request.
  • Set pull.rebase once and you'll stop seeing the "divergent branches" hint.

The error

To github.com:acme/shop.git
 ! [rejected]        main -> main (non-fast-forward)
error: failed to push some refs to 'github.com:acme/shop.git'
hint: Updates were rejected because the tip of your current branch is behind
hint: its remote counterpart. If you want to integrate the remote changes,
hint: use 'git pull' before pushing again.

A variant says (fetch first) and "the remote contains work that you do not have locally". Same cause, same fix.

Why it happens

A push is only accepted automatically if it's a fast-forward: the remote branch's latest commit must be an ancestor of yours, so the remote can simply move its pointer forward. If someone pushed commit C while you were making commit D on top of the older commit B, the histories have split. Accepting your push would delete C from the branch. Git refuses, and asks you to combine the two first.

Common ways to end up here:

  • A teammate pushed to the same branch.
  • You committed from another laptop, or edited a file in the GitHub web editor.
  • You created the repo on GitHub with a README or licence, then tried to push a local project.
  • A bot committed: Dependabot, a release workflow, a formatter.
  • You amended or rebased commits you had already pushed.
A B C origin/main Dyour main: push rejected D′after pull --rebase:fast-forward, push OK git pull --rebase origin main && git push
Your commit D and the remote's commit C both build on B, so the remote can't just move forward to D without losing C. Rebasing replays D on top of C, and then the push is a simple fast-forward.

The fix: pull with rebase, then push

git status                       # commit or stash any uncommitted work first
git pull --rebase origin main
git push origin main

--rebase takes your local commits, sets them aside, updates your branch to match the remote, then replays your commits on top. History stays a straight line, without an extra "Merge branch 'main' of github.com..." commit. A plain git pull (merge) is also correct; it just adds a merge commit.

If the rebase stops with a conflict

git status                       # lists files with conflicts
# edit each file, keep the right lines, remove the <<<<<<< ======= >>>>>>> markers
git add path/to/file
git rebase --continue
# changed your mind?
git rebase --abort               # back to exactly where you started

During a rebase, "ours" and "theirs" are swapped compared with a merge: "ours" is the remote's version you're rebasing onto. Read the conflict content, not the labels. For lock files like package-lock.json, take the remote version and regenerate it with a fresh install rather than merging by hand.

"You have divergent branches" when you pull

hint: You have divergent branches and need to specify how to reconcile them.
fatal: Need to specify how to reconcile divergent branches.

Newer versions of Git make you choose merge or rebase instead of guessing. Pick once:

git config --global pull.rebase true     # my preference
git config --global rebase.autoStash true  # stash and re-apply local edits automatically

"refusing to merge unrelated histories"

You created the GitHub repo with a README, then tried to push a project you started locally. The two histories have no common commit. If the remote only has that README:

git pull origin main --allow-unrelated-histories
git push -u origin main

When is force-pushing OK?

Only when you deliberately rewrote history on a branch that only you use, for example after squashing commits on your feature branch before a review. Even then, use the safe version:

git push --force-with-lease origin feature/checkout

--force-with-lease checks that the remote branch is still where you last saw it. If a teammate pushed in the meantime, it refuses instead of erasing their work. Plain --force erases it without asking. On main, don't force at all: if main deploys to production, a force-push can redeploy old code or break the pipeline for everyone.

Rejections that aren't about history

  • remote: error: GH006: Protected branch update failed: the branch requires pull requests, reviews or passing checks. Push to a new branch and open a PR.
  • ! [remote rejected] main -> main (pre-receive hook declined): a server-side rule rejected the push. Common causes are a secret detected in the commit by push protection, a file over the size limit, or a commit message rule. Read the remote: lines above it.
  • Permission denied (publickey): an SSH authentication problem, not a rejection. See my SSH permission denied guide.
  • refusing to allow a Personal Access Token to create or update workflow: your token lacks the workflow scope needed to change files in .github/workflows.

Habits that prevent it

  • Pull before you start working, not only before you push.
  • Work on short-lived branches and merge through pull requests. Two people rarely push to the same branch then.
  • Protect main and let CI test every PR. My GitHub Actions deploy with auto-rollback deploys only what lands on main, and rolls back if the health check fails.
  • Teach AI coding agents your rules. If Claude Code or Codex commits for you, put "never force-push main" in your AGENTS.md or CLAUDE.md.

Frequently asked questions

What does "non-fast-forward" mean in Git?

Your branch doesn't contain the latest commit on the remote branch, so the remote can't just move forward to your commit. Accepting the push would drop the remote's newer commits, so Git rejects it until you combine the two histories.

Should I use git pull or git pull --rebase?

Both are safe. Rebase keeps a straight history and is the common choice for personal local commits. Merge keeps the exact history and adds a merge commit. Teams usually pick one and set pull.rebase accordingly.

Is git push --force safe?

Not on a branch other people use, because it overwrites their commits. Use --force-with-lease, and only on your own branches after an intentional rewrite such as a squash or rebase.

Will git pull --rebase delete my changes?

No. Your commits are replayed on top of the remote ones. If something goes wrong, git rebase --abort returns you to where you started, and git reflog can recover any commit you had.

How do I fix "failed to push some refs to origin"?

Read the line above it. "rejected (non-fast-forward)" or "fetch first" means pull first. "remote rejected" means a server rule like branch protection or push protection blocked it, which the remote: lines explain.

Want pushes that deploy themselves, safely?

I set up Git workflows and GitHub Actions pipelines that test every change, deploy on merge and roll back automatically. See my CI/CD pipeline service, all DevOps services, or tell me how your team ships today.

MD Rakibul Islam Rakib

Written by

MD Rakibul Islam Rakib

Full-stack developer, DevOps engineer and Linux system administrator with 5+ years of production experience. I deploy, harden and fix servers and web apps for clients worldwide, and everything in this article runs on real servers I manage, including this site.

  • git push rejected
  • non-fast-forward
  • failed to push some refs
  • git pull --rebase
  • force-with-lease
  • divergent branches
  • GitHub

Keep reading

WordPress to Next.js Migration Without Losing SEO
Website DesignOct 9, 2026

WordPress to Next.js Migration Without Losing SEO

Moving WordPress to Next.js makes a site faster and safer, but only if you keep every URL, redirect old ones with 301s and carry over titles and meta tags. Business owners usually ask me about this after one of three things: the WordPress site got hacked, it fails Core Web Vitals no matter how many caching plugins they add, or the plugin and hosting bills keep growing. Next.js fixes all three well. This site is a Next.js 16 app, and I've rebuilt WordPress sites this way. But a migration done carelessly can wipe out years of Google rankings in a week. This guide covers when it's worth it, the two ways to do it, and the SEO steps that keep your traffic. Key takeaways Migrate for a reason: speed, security, custom features or cost. If your team lives in the WordPress editor and the site is fine, a headless setup or a tune-up may be better. Two paths: headless (keep WordPress as the editor, Next.js as the website) or full move (content goes into Markdown, a headless CMS or your own database). Crawl the old site first and keep a list of every URL. That list is your redirect map and your checklist. Keep URLs identical where you can. Where they must change, add one 301 redirect per old URL, never a blanket redirect to the homepage. Carry over titles, meta descriptions, alt text and structured data , then watch Search Console for a few weeks. Is it worth moving off WordPress? Good reasons to migrate: Speed. A Next.js site sends pre-rendered HTML and only the JavaScript a page needs. Page-builder themes often load large CSS and script bundles on every page. Faster pages help rankings and conversions; see my guides on fixing slow LCP and INP . Security. Most WordPress hacks I've cleaned up came through an outdated plugin or theme. A Next.js site has no public admin login and no plugin folder to attack. Custom features. Booking, dashboards, customer portals and integrations are normal code in Next.js, not a stack of plugins fighting each other. Running costs. No premium plugin licences to renew, and a fast site runs on a small VPS. My hosting cost comparison shows the options. Reasons to wait: non-technical editors who rely on the WordPress editor daily, a WooCommerce shop with many extensions you'd have to replace, or a site that already performs well. Changing technology doesn't fix weak content or an unclear offer. Path 1: Headless WordPress WordPress stays where your team writes, and Next.js becomes the public website. Next.js reads posts and pages from the built-in REST API ( /wp-json/wp/v2/posts ) or from the WPGraphQL plugin: // app/blog/[slug]/page.tsx import { notFound } from 'next/navigation'; const WP = 'https://cms.example.com/wp-json/wp/v2'; export default async function Post({ params }: { params: Promise<{ slug: string }> }) { const { slug } = await params; const res = await fetch(`${WP}/posts?slug=${slug}&_embed`, { next: { revalidate: 300 } }); const [post] = await res.json(); if (!post) notFound(); return <article dangerouslySetInnerHTML={{ __html: post.content.rendered }} />; } Editors keep their workflow, and the slow, plugin-heavy front end disappears. Move WordPress to a subdomain such as cms.example.com , block it from search engines, and protect its login. The catch: you now run two systems, and page-builder layouts don't come across, because Next.js renders the content, not the builder. Path 2: Full migration Export the content once and switch WordPress off. Content goes into Markdown or MDX files in the repo (great for small, developer-run sites), a headless CMS such as Sanity, Strapi or Payload, or your own database with an admin dashboard, which is how this site works. Pull everything through the REST API with a script, convert the HTML, download the media, and keep each post's slug, date, title, excerpt and SEO fields. You end up with one system, fewer moving parts, and nothing left to patch every week. Every URL from the old site needs a destination: the same path, or a 301 redirect to its new address. Old URLs left without one return 404s, and the rankings they earned disappear with them. The SEO checklist that protects your rankings 1. Inventory every URL before you touch anything Export the old site's URLs from three places: the XML sitemap (Yoast and Rank Math put it at /sitemap_index.xml ; core WordPress at /wp-sitemap.xml ), a crawl with a tool like Screaming Frog, and Search Console's Pages and Performance reports. Mark the pages that get traffic or backlinks. Those must not break. 2. Keep the same URLs Next.js routes can match almost any WordPress structure. If posts lived at /my-post/ , use an app/[slug]/page.tsx route. If you want cleaner URLs, change them on purpose and redirect, not by accident. Watch trailing slashes: WordPress adds them, Next.js doesn't by default. Set trailingSlash: true in next.config.ts if you keep the old style. 3. Redirect what changes // next.config.ts export default { async redirects() { return [ { source: '/:year(\\d{4})/:month(\\d{2})/:slug', destination: '/blog/:slug', permanent: true }, { source: '/category/:cat', destination: '/blog?topic=:cat', permanent: true }, { source: '/feed', destination: '/rss.xml', permanent: true }, ]; }, }; permanent: true sends a 308, which search engines treat like a 301. For hundreds of one-off URLs, keep them in a map file or do them in Nginx. Never redirect everything to the homepage. Google treats that as a soft 404 and drops the rankings anyway. 4. Carry over the SEO data Export the title and meta description from your SEO plugin for every page, and set them with generateMetadata . Keep image alt text, canonical tags, Open Graph images, and structured data such as Article, FAQ, Product and LocalBusiness. Generate a sitemap with app/sitemap.ts and a robots.ts . 5. Don't forget the hidden features Contact forms (and their spam protection and email delivery, see emails going to spam ), the search box, comments, RSS, analytics, cookie consent and newsletter embeds. List every plugin and decide what replaces each one. 6. Launch, then watch Switch DNS when traffic is lowest, keep the old server running for a few days, then submit the new sitemap and test key URLs in Search Console. Crawl the old URL list against the new site and expect a 200 or a single 301 for every one, never a 404 or a redirect chain. My zero-downtime migration guide covers the DNS cutover, and redesign without losing SEO has the full checklist. Frequently asked questions Is Next.js better than WordPress for SEO? Next.js makes it easier to build fast pages with clean HTML, which helps Core Web Vitals. But rankings come from content, links and technical basics. A well-optimised WordPress site can outrank a careless Next.js one, so the migration must preserve URLs and metadata. Will I lose rankings when moving from WordPress to Next.js? Not if you keep URLs the same or 301-redirect every changed one, keep titles and meta descriptions, and keep the content. A short wobble for a few weeks is normal while Google recrawls. Big drops come from missing redirects. Can I keep using WordPress as a CMS with Next.js? Yes. That's headless WordPress: editors use the normal admin, and Next.js reads content through the REST API or WPGraphQL and renders the public site. Keep the WordPress admin off the public domain and updated. How long does a WordPress to Next.js migration take? A small business site of 10 to 30 pages is usually a few weeks including design, content transfer, redirects and testing. Large blogs, multilingual sites and WooCommerce shops take longer because there's more content and functionality to rebuild. What about WooCommerce? You can run WooCommerce headless or move to a commerce platform with an API, but checkout, payments, shipping and extensions all need to be rebuilt or replaced. Plan and price that part separately; it's usually most of the work. Thinking about leaving WordPress? I rebuild WordPress sites in Next.js with every URL, redirect and meta tag carried over, so you get the speed without losing your Google traffic. See my business website design and development service, all website design services , or send me your site for an honest opinion on whether it's worth it.

Read article →
Website "Not Secure" With SSL? Fix Mixed Content
Website DesignOct 9, 2026

Website "Not Secure" With SSL? Fix Mixed Content

A site that shows "Not secure" with a valid SSL certificate is loading something over http://. Find it in the browser console, then switch those URLs to https. You installed an SSL certificate, the address starts with https:// , and the browser still shows "Not secure" or a broken padlock. Visitors notice. Some leave, and a contact or checkout form that looks unsafe loses leads. This is almost always mixed content : the page itself is secure, but it loads an image, script, font or form target over plain http:// . I fix this during server moves and redesigns all the time, and it takes three steps: find the insecure URLs, fix them at the source, then add a safety net so new ones can't slip in. Key takeaways Open DevTools (F12) → Console. Every insecure resource is listed as a "Mixed Content" warning with its exact URL. Scripts, stylesheets and iframes over http are blocked , which can break menus, sliders and forms, not only the padlock. The real fix is changing http:// to https:// where the URL lives: the database, theme files, CSS, or a hard-coded embed. A form that submits to http:// makes Chrome warn on submit. Check every form's action . Add upgrade-insecure-requests as a safety net, and redirect all http traffic to https. Step 1: Find every insecure resource Open the page in Chrome, press F12, and go to the Console tab. Reload. Mixed content shows up like this: Mixed Content: The page at 'https://example.com/' was loaded over HTTPS, but requested an insecure script 'http://example.com/wp-content/plugins/slider/slider.js'. This request has been blocked; the content must be served over HTTPS. The Security tab in DevTools gives a summary for the page. Check more than the homepage: blog posts, the shop, the contact page and checkout often load different files. To scan from a terminal, search the raw HTML for http:// in the attributes that load things: curl -s https://example.com/ | grep -oE '(src|href|action|srcset)="http://[^"]+"' | sort -u curl -s https://example.com/wp-content/themes/mytheme/style.css | grep -o 'url(http://[^)]*' | sort -u Plain links to other sites ( <a href="http://..."> ) don't cause mixed content, though it's still worth updating them. What matters is anything the page loads : images, scripts, styles, fonts, iframes, video, and form targets. Why browsers treat it differently Browsers split mixed content into two kinds. For images, audio and video, Chrome first tries to load the same URL over https automatically, and only blocks it if that fails. Scripts, stylesheets, iframes and fetch requests are blocked outright, because an attacker on the network could change them and take over the page. That's why mixed content can do more than remove the padlock: a blocked jQuery or stylesheet can break the whole layout. Browsers upgrade insecure images and media to https when they can, but block insecure scripts, styles and iframes completely. One http script can remove the padlock and break a menu or a form at the same time. Step 2: Fix the URLs at the source WordPress Old http:// URLs live in the database: in post content, widget settings, theme options and page builder data. First set both addresses under Settings → General to https:// . Then replace the rest with WP-CLI, which handles serialized data safely (a plain SQL replace can corrupt it): wp db export before-https.sql # backup first wp search-replace 'http://example.com' 'https://example.com' --skip-columns=guid --dry-run wp search-replace 'http://example.com' 'https://example.com' --skip-columns=guid wp cache flush Run the dry run first and read the counts. If you use a caching plugin or a CDN, purge it afterwards, or visitors keep seeing the old HTML. Hard-coded URLs in themes, CSS and templates Search the code for http:// and change your own domain's URLs to https or to relative paths ( /images/logo.png ): grep -rn "http://" --include=*.{php,html,css,js,tsx} ./theme ./src | grep -v "http://www.w3.org" For third-party files (an old widget, font or analytics script), switch to the provider's https URL. If a provider doesn't support https at all in 2026, replace it. It's also a security risk. Forms Check the action of every form, including newsletter embeds. A form posting to http:// makes Chrome show a warning when the visitor submits, which kills conversions on contact and checkout pages. Step 3: "Not secure" but no mixed content? If the console is clean, look at these instead: Your app thinks it's on http. Behind Nginx, a load balancer or Cloudflare, the app sees plain http and builds http:// links. Pass proxy_set_header X-Forwarded-Proto $scheme; in Nginx and make the app trust it. In WordPress behind a proxy, check $_SERVER['HTTPS'] handling in wp-config.php . Cloudflare "Flexible" SSL. Browser to Cloudflare is encrypted, Cloudflare to your server isn't, and it often causes redirect loops. Install a certificate on the origin and use "Full (strict)". My too many redirects guide covers this. The certificate itself. Expired, issued for a different name (www vs non-www), or missing its chain. Click the padlock area to see the reason, and see Certbot renewal failed if it expired. Step 4: Add a safety net Redirect all http traffic to https with one 301, and tell browsers to upgrade any leftover http requests. In Nginx: server { listen 80; server_name example.com www.example.com; return 301 https://www.example.com$request_uri; } # inside the https server block: add_header Content-Security-Policy "upgrade-insecure-requests" always; add_header Strict-Transport-Security "max-age=31536000" always; upgrade-insecure-requests makes the browser fetch every http:// resource on the page over https. It hides problems rather than fixing them, so do it after step 2, not instead of it. HSTS tells browsers to always use https for your domain. Start with a short max-age if you're not sure every subdomain has a certificate. Does mixed content hurt SEO? HTTPS is a Google ranking signal, and Google's page experience guidance expects pages served securely. More directly, a "Not secure" warning and broken scripts hurt trust and conversions. If you just moved to https, also check that canonical tags, the sitemap and internal links all use the https URLs. My redesign without losing SEO checklist covers the redirect side, and crawled, currently not indexed helps if pages drop out afterwards. Frequently asked questions Why does my website say "Not secure" when I have SSL? The page loads at least one resource over plain http, which is called mixed content, or the certificate has a problem such as being expired or issued for a different domain. The browser console lists any mixed content URLs. How do I find mixed content on my website? Open Chrome DevTools with F12, go to the Console and reload the page. Each insecure resource appears as a "Mixed Content" warning with its URL. Repeat on your main templates: home, blog post, product, contact and checkout. Is upgrade-insecure-requests enough to fix mixed content? It's a good safety net, but it only works if every resource is also available over https. Fix the URLs at the source first, then keep the header to catch anything you missed. How do I fix mixed content in WordPress? Set the WordPress and Site Address to https under Settings, then run wp search-replace from http to https with a backup and a dry run first. Fix any remaining hard-coded URLs in the theme or plugins and purge caches. Does mixed content affect Google rankings? HTTPS is a lightweight ranking signal, and mixed content weakens it. The bigger cost is lost trust: browser warnings and broken scripts make visitors leave and stop forms from converting. Want a secure, fast site that converts? I fix SSL, mixed content and redirect problems, and build business websites that are secure and SEO-ready from day one. See my technical SEO audit and fix , all website design services , or send me your URL .

Read article →
Emails Going to Spam? Fix SPF, DKIM and DMARC (2026)
Linux System AdminOct 9, 2026

Emails Going to Spam? Fix SPF, DKIM and DMARC (2026)

Business emails land in spam mostly because SPF, DKIM or DMARC is missing or broken. Gmail's "Show original" shows which one fails; fix it in your DNS. When your quotes, invoices or contact-form replies go to spam, you lose customers without ever knowing it. Gmail, Yahoo and Outlook now expect every sender to prove the email really comes from their domain, and they're strict about it. I set up DNS and mail for the sites I build and host, and when a client tells me "customers say they never got our email", the cause is nearly always one of the authentication records below, or a contact form that pretends to send from the visitor's address. Here's how to check yours in five minutes and fix it. Key takeaways Check a real message first. In Gmail, open it, click the three dots, then "Show original". It shows PASS or FAIL for SPF, DKIM and DMARC. SPF lists which servers may send for your domain. One record only, and every service you send through must be in it. DKIM signs each email. Turn it on in every service that sends for you: Google Workspace, Microsoft 365, your newsletter tool, your app's email provider. DMARC ties them together and tells inboxes what to do with failures. Start with p=none and reports, then tighten. Contact forms must send from your own domain and put the visitor's address in Reply-To , never in From . Why inboxes got strict Since February 2024, Gmail and Yahoo require every sender to have SPF or DKIM, and bulk senders (about 5,000 or more messages a day to Gmail) to have SPF, DKIM and DMARC, one-click unsubscribe for marketing mail, and a spam complaint rate under 0.3%. Microsoft started enforcing similar rules for Outlook.com, Hotmail and Live in May 2025. You may not be a bulk sender, but the same checks decide where your emails land. Unauthenticated mail is the first thing filters push to spam. Step 1: Read the verdict on a real email Send an email from your business address to a Gmail account. Open it, then three dots → Show original . At the top you'll see: SPF: PASS with IP 209.85.220.41 DKIM: 'PASS' with domain example.com DMARC: 'PASS' Any FAIL, NEUTRAL or a missing line tells you where to start. Do this for every way your business sends email: your mailbox, your website's contact form, your shop's order emails, your newsletter. They're often different systems, and each needs its own setup. From a terminal you can read the records directly: dig +short TXT example.com | grep spf dig +short TXT _dmarc.example.com dig +short TXT google._domainkey.example.com # selector depends on the provider Step 2: Fix SPF SPF is a TXT record on your domain listing who may send for it. A typical one for Google Workspace plus a transactional email service: example.com. TXT "v=spf1 include:_spf.google.com include:amazonses.com ~all" Mistakes I find all the time: Two SPF records. Adding a second v=spf1 record for a new service breaks both. Merge them into one record. A sending service not listed. Your CRM or invoicing tool sends as your domain but isn't in the record. Check each tool's docs for its include: value. More than 10 DNS lookups. Each include can trigger several lookups, and past 10 SPF fails with a "permerror". Remove services you no longer use. Ending with +all , which lets anyone send as you. Use ~all (soft fail) or -all . Step 3: Turn on DKIM everywhere DKIM adds a digital signature to every email. The sending service gives you a public key to publish in DNS, usually as a TXT or CNAME record under selector._domainkey.example.com , and then you switch signing on in its admin panel. In Google Workspace it's under Apps → Gmail → Authenticate email; Microsoft 365 has it in the Defender portal. Google Workspace doesn't sign with your domain until you publish the record and click "Start authentication". That last click is the step people miss. Do the same for each service that sends as your domain. DKIM is what survives forwarding, so it matters more than SPF in practice. Receiving inboxes check that the sending server is allowed (SPF), that the message is signed by your domain (DKIM), and that both match the From address (DMARC). Pass all three and the email has a fair chance at the inbox. Step 4: Add DMARC DMARC tells receivers what to do when SPF and DKIM don't line up with the domain in the From address, and sends you reports. Start in monitor mode: _dmarc.example.com. TXT "v=DMARC1; p=none; rua=mailto:dmarc@example.com" After two to four weeks of reports showing all your legitimate senders pass, move to p=quarantine , then p=reject . That also stops scammers from sending fake invoices in your name. The raw reports are XML; a free DMARC report viewer makes them readable. Step 5: Fix your website's contact form This one is behind most "website emails go to spam" complaints I see. The form sends a message to you from the visitor's address, for example From: jane@gmail.com , through your web server. Gmail checks Gmail's DMARC policy, sees a server that isn't Gmail, and rejects or junks it. The correct setup: From: Website <forms@example.com> # your domain, authenticated To: sales@example.com Reply-To: jane@gmail.com # the visitor, so "Reply" still works And send through a proper email API or SMTP service (Amazon SES, Postmark, Resend, Brevo, or your Google Workspace account) with SPF and DKIM set up for example.com , not through PHP's mail() on the web server. Step 6: If you send from your own VPS Running your own mail server is possible, but it's the hardest path. Check these before blaming DNS: Port 25 is often blocked for outgoing mail by cloud providers by default. You may need to request unblocking. Reverse DNS (PTR) for the server's IP must point to a hostname that points back to the same IP. Set it in your VPS provider's panel. IP reputation. A new or previously abused IP starts with a bad reputation. Check it against blocklists, and use TLS for every connection. For most small businesses, a mailbox provider for people and a transactional email service for the website is cheaper than the hours a self-hosted mail server costs. My Cloudflare VPS setup checklist covers the DNS side of a new server, including not proxying mail records. Content and list habits still matter Only email people who asked , and make unsubscribing one click. Complaints hurt more than anything else. Separate marketing from transactional mail , for example newsletters from news.example.com , so a campaign can't drag down your invoices. Avoid link shorteners and image-only emails , and keep the visible link text matching the real URL. Watch Google Postmaster Tools once you send regularly. It shows your spam rate and domain reputation at Gmail. Frequently asked questions Why are my emails going to spam? The most common reasons are missing or broken SPF, DKIM or DMARC records, a contact form sending as the visitor's address, a poor sending IP, or recipients marking your mail as spam. Gmail's "Show original" tells you which authentication check fails. Do I need SPF, DKIM and DMARC? Yes, all three. Gmail and Yahoo require at least SPF or DKIM from every sender and all three from bulk senders, and Microsoft enforces similar rules. Without them your email is much more likely to be filtered or rejected. Can I have two SPF records? No. A domain with two v=spf1 records fails SPF entirely. Combine all senders into one record with several include: entries, and stay under 10 DNS lookups. How long do DNS changes for SPF, DKIM and DMARC take? Usually minutes to a few hours, depending on the record's TTL. Test with dig or an online checker, then send a fresh email and check "Show original" again. Old emails won't change. Why do my website contact form emails go to spam? Usually the form sends from the visitor's email address through your web server, which fails their domain's DMARC check. Send from your own domain through an authenticated email service and put the visitor's address in Reply-To. Want your emails in the inbox? I set up domains, DNS, SPF, DKIM, DMARC and website email sending for small businesses, and fix contact forms that lose leads. See my business website service , all Linux system admin services , or send me your domain and I'll check your records.

Read article →