RustFS with Next.js: Presigned URL Uploads That Are Safe
 MD Rakibul Islam RakibFull-stack developer, DevOps & Linux engineer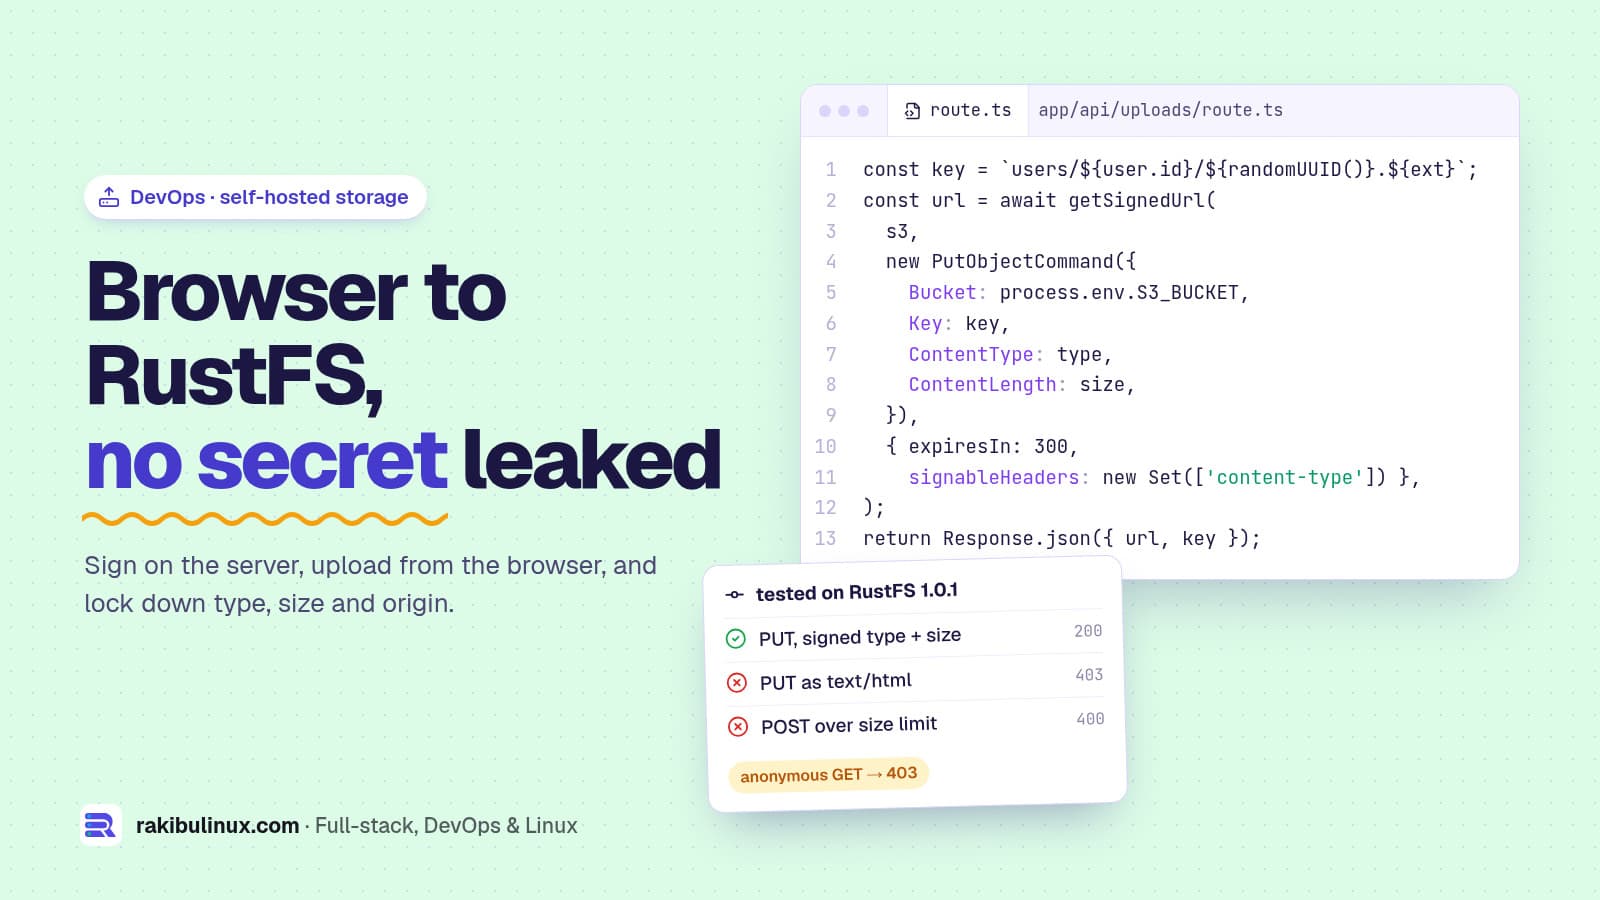
To upload from Next.js to RustFS, sign a short-lived URL on the server with the AWS S3 SDK, then let the browser send the file straight to RustFS.
This website stores its uploads in RustFS, the open-source S3-compatible server I moved to after MinIO's community edition was archived (the story is in my MinIO alternatives guide). RustFS reached 1.0 in September 2026. Every snippet below was tested against RustFS 1.0.1 in Docker on 10 October 2026, and I show the real responses, including one default in the AWS SDK that quietly lets a browser upload HTML where you expected a PNG.
Key takeaways
- RustFS speaks S3. Use the official
@aws-sdk/client-s3withforcePathStyle: trueand your RustFS endpoint. No RustFS-specific SDK needed. - The server decides the key, type and size. The browser only gets a URL that is valid for one object, one content type and a few minutes.
- Sign the Content-Type header. By default
getSignedUrlsigns the size but not the type. PasssignableHeadersor anyone can upload a different file type. - Use a presigned POST for hard size limits. Its policy can say "between 1 byte and 5 MB", and RustFS refuses bigger files.
- Keep the bucket private and add a CORS rule for your site only. Serve files through signed GET links or your own API route.
Proxy through your API or presign?
There are two honest ways to put user files into object storage:
- Proxy: the browser posts the file to your API, which streams it to RustFS. Simple, one place for checks, and the storage server never has to be public. The cost is that every byte passes through your Node process. This site does it this way because uploads are small images from the admin dashboard.
- Presigned URL: your API checks the request and signs a URL, and the browser uploads directly to RustFS. Your app server never touches the file, so large videos, PDFs and phone photos don't tie up Node or hit body size limits in Next.js or Nginx.
For customer uploads in a SaaS app, presigned URLs are the better default. The rest of this guide builds that version.
Step 1: run RustFS and create a bucket
For a test, one container is enough. RustFS listens on port 9000 for the S3 API and 9001 for the web console:
docker run -d --name rustfs -p 9000:9000 -p 9001:9001 \
  -e RUSTFS_ACCESS_KEY=change-me \
  -e RUSTFS_SECRET_KEY=a-long-random-secret \
  -v /data/rustfs:/data \
  rustfs/rustfs:1.0.1
If you don't set the two keys, RustFS falls back to rustfsadmin / rustfsadmin. That is fine on your laptop and a disaster on a server. For this site it runs as a systemd service bound to 127.0.0.1, so only the API on the same server can reach it. For presigned uploads the S3 port must be reachable from browsers, so put Nginx with HTTPS in front of it, and give the app its own access key limited to its bucket instead of the root keys.
Step 2: one S3 client for the server
// lib/s3.ts
import 'server-only';
import { S3Client } from '@aws-sdk/client-s3';

export const s3 = new S3Client({
  endpoint: process.env.S3_ENDPOINT,      // https://s3.example.com
  region: 'us-east-1',                    // RustFS default
  forcePathStyle: true,                   // https://host/bucket/key
  credentials: {
    accessKeyId: process.env.S3_ACCESS_KEY!,
    secretAccessKey: process.env.S3_SECRET_KEY!,
  },
});
The server-only import makes the build fail if a client component ever imports this file, so the secret can't end up in a JavaScript bundle by accident. Never prefix these variables with NEXT_PUBLIC_.
Step 3: a route handler that signs one upload
The browser asks to upload a file of a given type and size. The server checks the user, checks the type against an allowlist, picks the key itself and signs a URL that expires in five minutes:
// app/api/uploads/route.ts
import { randomUUID } from 'node:crypto';
import { PutObjectCommand } from '@aws-sdk/client-s3';
import { getSignedUrl } from '@aws-sdk/s3-request-presigner';
import { s3 } from '@/lib/s3';
import { getCurrentUser } from '@/lib/auth'; // your session helper

const TYPES: Record<string, string> = { 'image/jpeg': 'jpg', 'image/png': 'png', 'application/pdf': 'pdf' };
const MAX = 10 * 1024 * 1024; // 10 MB

export async function POST(req: Request) {
  const user = await getCurrentUser();
  if (!user) return new Response('Unauthorized', { status: 401 });

  const { type, size } = await req.json();
  const ext = TYPES[type];
  if (!ext || !Number.isInteger(size) || size < 1 || size > MAX) {
    return new Response('File type or size not allowed', { status: 400 });
  }

  const key = `users/${user.id}/${randomUUID()}.${ext}`; // never the user's file name
  const url = await getSignedUrl(
    s3,
    new PutObjectCommand({ Bucket: process.env.S3_BUCKET, Key: key, ContentType: type, ContentLength: size }),
    { expiresIn: 300, signableHeaders: new Set(['content-type']) },
  );
  return Response.json({ url, key });
}
Here is what I got when I tried to break it on RustFS 1.0.1:
- Upload with the signed type and size: 200.
- Same URL, a body of a different size: 403
SignatureDoesNotMatch. - Same URL,
Content-Type: text/html: 403, but only because ofsignableHeaders.
Without signableHeaders, the signed headers in the URL are just content-length;host. The HTML upload then returned 200 and RustFS stored the object as text/html. If those files are ever served from a domain your users trust, that is a stored cross-site scripting hole. Sign the type.
Step 4: upload from the browser
async function upload(file: File) {
  const res = await fetch('/api/uploads', {
    method: 'POST',
    headers: { 'content-type': 'application/json' },
    body: JSON.stringify({ type: file.type, size: file.size }),
  });
  if (!res.ok) throw new Error(await res.text());
  const { url, key } = await res.json();

  const put = await fetch(url, { method: 'PUT', headers: { 'content-type': file.type }, body: file });
  if (!put.ok) throw new Error(`Upload failed: ${put.status}`);
  return key;
}
The browser sets Content-Length from the file automatically, which is why signing the size works. fetch has no upload progress events, so use XMLHttpRequest and its upload.onprogress if you need a progress bar for large files.
Step 5: allow your site with a CORS rule
The upload is a cross-origin request from app.example.com to s3.example.com, so the bucket needs a CORS rule. RustFS 1.0.1 accepted the standard S3 call:
import { PutBucketCorsCommand } from '@aws-sdk/client-s3';

await s3.send(new PutBucketCorsCommand({
  Bucket: 'uploads',
  CORSConfiguration: { CORSRules: [{
    AllowedOrigins: ['https://app.example.com'],
    AllowedMethods: ['PUT', 'POST', 'GET'],
    AllowedHeaders: ['*'],
    ExposeHeaders: ['ETag'],
    MaxAgeSeconds: 3000,
  }] },
}));
In my test, a preflight from the allowed origin got 200 with the right Access-Control-Allow-Origin, and one from any other origin got 403. List your real origins; * is not a shortcut you want here.
When you need a hard size limit: presigned POST
A presigned PUT locks the exact size the browser declared. If you want a range instead, for example "anything up to 5 MB", use a presigned POST. The browser submits a form, and the signed policy carries the rules:
import { createPresignedPost } from '@aws-sdk/s3-presigned-post';

const { url, fields } = await createPresignedPost(s3, {
  Bucket: 'uploads',
  Key: `users/${user.id}/${randomUUID()}.jpg`,
  Conditions: [
    ['content-length-range', 1, 5 * 1024 * 1024],
    ['eq', '$Content-Type', 'image/jpeg'],
  ],
  Fields: { 'Content-Type': 'image/jpeg' },
  Expires: 300,
});
// browser: FormData with every field, then the file last, POST to url
RustFS enforced both conditions: a small file got 204, a file over the limit got 400 EntityTooLarge, and a changed content type got 400 InvalidPolicyDocument.
Step 6: confirm the upload before you trust it
A signed URL is a promise the browser may not keep. It can upload nothing, or fail halfway. So after the upload, the browser calls a second endpoint with the key, and the server checks the object with HeadObjectCommand (size and type) before saving a database row that links it to the user. Only keys that start with that user's own prefix are accepted.
Keys that were signed but never confirmed are orphans. A small nightly job that lists recent keys and deletes the ones without a database row keeps the bucket clean.
Downloads: keep the bucket private
Don't make the bucket public just to show images. In my test an anonymous GET on an uploaded object returned 403, which is what you want. You then have two options:
- Signed GET links from
GetObjectCommandwith a shortexpiresIn. AddResponseContentDisposition: 'attachment; filename="report.pdf"'to force a download with a friendly name; RustFS returned that header as asked. - Your own route that checks the user and streams the object, with long cache headers for files that never change. This site does that for public images, and it falls back to local disk for files from before the migration.
Production notes: Nginx, backups and recovery
- Nginx in front of RustFS needs
proxy_set_header Host $http_host;, because the signature includes the host name, plusclient_max_body_sizebig enough for your largest file andproxy_request_buffering off;so uploads stream. If uploads fail with 413, see my Nginx 413 fix. - Back up the bucket somewhere else.
rclone syncto a second server or provider on a schedule works with any S3 endpoint. A copy on the same disk is not a backup. - Test a restore. Restore a few objects to a scratch bucket every month and open them. Until you have done that, you have a hope, not a backup.
Frequently asked questions
Is RustFS production-ready in 2026?
RustFS published its 1.0.0 release in September 2026 and 1.0.1 in early October. I run it for this site's uploads. As with any young project, pin a version, read the release notes before upgrading and keep an independent backup.
Do I need a RustFS SDK for Next.js?
No. RustFS implements the S3 API, so the official AWS SDK for JavaScript works. The two settings that matter are your RustFS URL as endpoint and forcePathStyle: true.
Why do I get SignatureDoesNotMatch?
The request doesn't match what was signed: a different size or content type, a changed host name (often a reverse proxy rewriting Host), an expired URL, or a server clock that is far off. Compare the X-Amz-SignedHeaders list in the URL with what the browser actually sent.
Presigned PUT or presigned POST?
Use PUT when you know the exact size up front, which is the case for a file picked in the browser. Use POST when you want a size range or HTML form uploads. Both keep the secret on the server.
Can I migrate from MinIO or AWS S3 without changing code?
Mostly yes. Copy the buckets with rclone, keep the same object keys, and change the endpoint and keys in your environment. Test signed URLs and CORS after the switch, since those depend on the new host name.
Want self-hosted storage set up for your app?
I set up RustFS, Nginx, backups and the upload code for Next.js and Node.js apps, on your own VPS. See my DevOps services or send me a message with your stack and file sizes.

Written by
MD Rakibul Islam Rakib
Full-stack developer, DevOps engineer and Linux system administrator with 5+ years of production experience. I deploy, harden and fix servers and web apps for clients worldwide, and everything in this article runs on real servers I manage, including this site.
- RustFS Next.js
- presigned URL upload
- RustFS Node.js
- S3 presigned POST
- self-hosted file storage
- RustFS CORS
- aws-sdk getSignedUrl